"For More Information on Building Your Own Shed Plans"
First step is to call the local building department to determine whether you need a building a permit. Some communities have strict zoning laws that dictate where a shed can be located and how it is to be constructed. Owners pay a fine, move or dismantle sheds that are found to be in violation of these laws.
Second step is to get the site ready. Clear trees and shrubs as needed. Make sure the land is level by excavating dirt out of high areas or filling in low spots. Ensure electricity is at the site to operate power tools by running a heavy duty electrical cord from the house. Cover your garden to protect it from debris.
"For More Information on Growing Beautiful Gardens"
Third step is to prepare to build a shed. Go to the lumberyard or home-building store and order the lumber, siding and roofing. Pick up the materials or have them delivered to the site. Mark off the exact location of where you plan to build a shed with stakes. Make the site accessible to delivery trucks if materials are to be delivered.
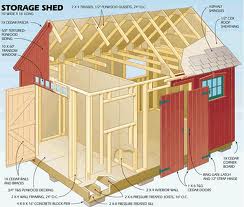
Fourth step is to complete the groundwork. Put the foundation blocks in place. Build a frame out of joist stock that is the same size as the shed's perimeter. For larger sheds, attach a girder or horizontal beam to the center for extra support. Cut and install joists then lay and nail ¾-inch sheets of plywood for the floor.
Fifth step is to Frame the shed walls. Lay out the top and sole plates, or the top and bottom of the walls and studs. Nail the pieces together and make sure the structure is square. Cut and nail the wall studs--16 inches apart--that go between the top and bottom plates. Brace and raise the walls one at a time. Cover the studs with ½-inch plywood sheathing. Remember to cut a door opening in the sheathing that is 2 inches larger than the door.
"For More Information on Woodworking Guides"
Sixth step is to construct the roof. Install pole supports for the rafters, 1 vertical pole at each end of the shed topped by 1 horizontal ridgepole. Cut a master rafter to use as a template for the remaining rafters. Build and attach the trusses. Cut and install plywood roof sheathing.
Next step is to trim out and side the shed. Cut then pre-paint or stain the trim boards on sawhorses before applying them to the shed to save time. Glue then nail the rake board, the horizontal trim piece nailed to the ends of the rafters, immediately below the roof edge. Add the corner boards, trim that covers the space where any two walls meet. Tack a board along the base to act as a straight edge guide, then nail the siding and cut off any protruding edges.
Next step is to cover the roof with asphalt shingles. Secure eave drips to the bottom edge of the roof to protect against water infiltration. Tack roofing felt to the sheathing. Install drip edges to the gable edges. Nail a course of roof shingles upside down with the tabs facings toward the peak. Cover the start shingles with a row of three tab shingles with the tabs facing down. Stagger the next row of shingles and continue until one side is finished, then repeat the process on other side.
Next step is to install pre-hung doors. Cut out the bottom plate inside the rough opening. Set the door into the opening. Insert a shim behind each hinge, between the hinge jamb and the framing. Connect the doorjamb with the framing by nailing through the molding and the shims with casing nails.
And the last step is to clean up the work site around the shed. Gather tools and scrap materials to clear the site of debris. Congratulations! You have built your own garden storage shed that will last you for years to come.
"For more Information on Building Your Own Shed Plans"
Please Help Support and Donate to charities:
The Leukemia & Lymphoma Society (LLS)
http://www.lls.org/#/waystohelp/donate/donateonline/
The American Diabetes Association
http://www.diabetes.org/donate/
American Heart Association
https://donatenow.heart.org/
National Breast Cancer Foundation, INC.
https://www.nationalbreastcancer.org/
American Red Cross
https://www.redcross.org

